


Courses by Software
Courses by Semester
Courses by Domain
Tool-focused Courses
Machine learning
POPULAR COURSES
Success Stories

Week 3 - External flow simulation over an Ahmed body.
AIM -A simulation for external flow analysis over an Ahmed body is to be carried out for the velocity of 25 m/sec with the default air properties in Ansys fluent. INTRODUCTION - It is asked to compute an external flow simulation over an Ahmed body using air, with a 25 m/sec velocity, as working fluid. The geometry…
Bhavesh Kumbhare
updated on 10 Jan 2023


AIM -
A simulation for external flow analysis over an Ahmed body is to be carried out for the velocity of 25 m/sec with the default air properties in Ansys fluent.
INTRODUCTION -
It is asked to compute an external flow simulation over an Ahmed body using air, with a 25 m/sec velocity, as working fluid. The geometry provided is an axially symmetric Ahmed body, and hence, one may split the entire body into two halves, and perform the simulation on only one half deleting the other identical half. Later, during the post-processing, we will create the other identical half and obtain the relevant results from the simulation.
The reason to perform the simulation on half structure only, deleting the identical half, is to reduce the number of cell counts, computational time, and cost.
THEORY -
Mesh Independent Study -
It is the method of investigating whether the simulation results are independent of the underlying mesh or not. Find the coarse mesh, which gives reasonable accuracy results. In simple words, it is the optimal grid condition that has the smallest number of grids without generating a difference in the numerical results.
Procedure:
- Start with coarse mesh
- Refine the mesh and run the problem several times
- Compare the results with the previous solution until a constant result is achieved.
Inflation Layers -
Simply put, 'Inflation layers' refers to a fine mesh or layers of a fine mesh generated in the domain's region of interest. Generally, inflation layers are created at the boundary layer phenomenon to capture the various parameters at the boundary of the body. The total thickness of the inflation layers should be equal to the thickness of the boundary layer. To produce inflation layers, the first layer thickness, growth factor, and the maximum number of layers are needed, out of which the first layer thickness is calculated externally using Y+ values.
Total inflation layers' thickness = (First layer Thickness)*{[1-g^(N+1)]/(1-g)} where g is the growth rate & N is the total number of layers
The y+ value is a non-dimensional distance from the wall to the first mesh node.

The Ahmed Body and its importance -
The Ahmed body is an extensively used standard model in the automobile industry for testing simulation tools. The Ahmed body form is easy to create while still retaining car-like geometry traits. For aerodynamic simulation software, the Ahmed body serves as a standard. The basic geometric shape measures 1.044 meters in length, 0.288 meters in height, and 0.389 meters in breadth. Its 0.5-meter cylindrical legs are joined to the body's bottom, and the back surface has a slant that abruptly ends at a 40-degree angle.

Significance -
The Ahmed body produces the important features of the flow pattern that surrounds an automobile, such as relative uniform airflow in the center, flow separation, and wake formation in the back. Since the Ahmed body is simple to model, it can be used with ease to research a variety of properties such as turbulence, drag coefficient, wake region, lift forces, velocity magnitude at various regions of the car, and magnitude of pressure around the car. This helps in determining what will be resistance, fuel efficiency, etc. of the car and gives designers a clear idea of which region needs to be optimized for better effectiveness.
Negative pressure in the Wake Region -
When a fluid separates from a body, it forms a separate region between the body and the fluid stream. This region behind the body where recirculating occurs is called as Separated region or 'Wake' region. In any external flow, near the boundary of the body, as the fluid accelerates the pressure keeps on decreasing. And at a particular point, pressure increases large enough. The flow reverses its direction since it cannot travel backward due to the ongoing fluid flow, it detaches from the surface of the object, and an adverse pressure gradient is created due to the pressure distribution. Thus, a difference in pressure between the front and the rear of the body due to pressure distribution is created and a low-pressure region behind the body is formed, which results in two large drag forces. It can also cause 'Vortex Shedding', that is, unwanted vibration and instability in the fluid flow.

Significance of the Point of Separation -
The point at which fluid separates from a body, during the external flow, is called the 'Point of Separation'. Delaying the formation of the point of separation results in reduced drag force. The point of separation gives rise to the Wake region. The location of the separation point depends on several factors such as the Reynolds number, the surface roughness, and the level of fluctuations in the free stream, and it is usually difficult to predict exactly where separation will occur unless there are sharp corners or abrupt changes in the shape of the solid surface. In streamlined bodies, the point of separation never occurs and the only factor responsible for drag force is the wall shear stress. Due to the mixing of the fluid layers in a turbulent flow, the point of separation occurs earlier in a laminar flow than it occurs in a turbulent flow.


SOLVING & MODELLING APPROACH -
Any CFD simulation problem has the following workflow:
- Problem definition
- Pre-processing
- Solver or Processing
- Post-processing
We will run simulations a certain number of times with different mesh lengths, starting with a coarse mesh and working our way gradually toward refined versions, to achieve the best results. Additionally, the academic version of Ansys Fluent has constraints of up to 5,00,000 cell count, which may prevent the generation of highly refined mesh geometry. Therefore, in accordance with the mesh independent study, we'll try to refine the mesh as far as we can, within the limitations of cell count, and run the simulation for each case. Finally, we will summarise the results of the entire mesh-independent study and draw relevant conclusions and inferences.
Open the Ansys Workbench, and double-click the 'Fluid Flow (Fluent)' system. Rename the system as "Case 1".
PRE-PROCESSING -
Right-click over the 'Geometry' file to open SpaceClaim.
Before importing the model, first, change the units to 'Meters'.
File > Spaceclaim Options > Units > Type = Metric & Length = Meters > OK 
Now, import the 'Ahmed Body' model into the Spaceclaim.
Now, in order to perform the simulation for external flow analysis, over the Ahmed Body, we need to create two enclosures (outer and inner) around it and mesh those enclosures with varying elements size.
Note - One may either create the enclosures first and then split the entire structure into two halves deleting any one of them or delete the identical half first and then create the enclosures. Both ways are acceptable.
Here, we will first delete one-half of the body and then create the enclosures.
To split the body into two halves, we need to create planes.
Design Toolbar > Plane > click the origin of the coordinate system 
Thus, planes will be created.
To split the body into two halves:
Design Toolbar > Split Body > box select the entire body > click 'Select Cutter' > select the newly created plane > select any one half to remove > click escape 
Let's create the enclosures now. First, we will create the outer enclosure.
Prepare Toolbar > Enclosure > box select the entire geometry > disable the 'Symmetric dimensions' > put the corresponding values of the distance of the body from the enclosure surfaces > click the 'Tick' button 
Similarly, by hiding the outer enclosure, we will create the inner enclosure. 
|
Sr. No. |
Distance between the enclosure and the body |
Dimensions for the outer enclosure (m) |
Dimensions for the inner enclosure (m) |
|
1 |
Front |
2 |
0.5 |
|
2 |
Back |
5 |
1 |
|
3 |
Top |
1 |
0.5 |
|
4 |
Bottom |
0 |
0 |
|
5 |
Side (toward the identical half) |
0 |
0 |
|
6 |
another side |
0.5 |
0.25 |
Delete the plane which was created earlier.
Before moving on to the mesh, we will now execute a few operations on this structure in order to produce a mesh that is error-free.
First, to detect and fix overlapping surfaces and areas:
Prepare Toolbar > Interference > click the 'Tick' button
Hide the Ahmed body and click 'Suppress for Physics' as we don't need the entire Ahmed body for the simulation purpose.
In order for the mesh information to travel from one edge to another (particularly in between inner and outer enclosures), it is then necessary to share the coinciding surfaces:
Workbench Toolbar > Share > click the 'Tick' button 
Thus, we are done with the geometry simplification in Spaceclaim. Close the Spaceclaim.
Now, we need to perform the "Mesh Independent Study" over the simplified geometry structure to find out optimum results (drag and lift coefficient) during the post-processing.
Under mesh independent study, we will perform meshing of the structure three individual times with different element mesh lengths each time.
Here, we need to add inflation layers so as to capture the parameters near the boundary (no-slip walls) of the Ahmed body.
We will find the first layer thickness using an external y+ value calculator:
Putting,
y+ value = 30
Free stream velocity = 25 m/sec
Characteristic length = 1 m
Thus, the first layer thickness obtained is 0.000444 meters (0.44 mm)
Now, Open "Mesh File" in Workbench
First, we will generate the mesh over the geometry.
Name Selections:
Inlet - Front surface of the outer enclosure
Outlet - Rear surface of the outer enclosure
Symmetry Walls - four side surfaces of the outer enclosure
Car Wall - all the outer surfaces of the Ahmed body
During the selection of 'Car Wall', hiding other faces will ease the selection. 
Now, we will employ different mesh lengths at different regions of the geometry:
- At first, we will mesh the inner enclosure with 50 mm mesh and the element size for the base mesh will be 100 mm.
Outline > Mesh > right click & click 'Insert' > click 'Sizing' > select the inner enclosure > put Element Size = 50 mm > click Mesh > put Element Size (Base size) = 100 mm > Update the Mesh
- Later, we will mesh the outer enclosure with the 'Multizone' method of mesh.
Outline > Mesh > right click & click 'Insert' > Method > select the outer enclosure > change the method from 'Automatic' to 'Multizone' > Update the Mesh
With the use of the Multizone tool, quadrilateral mesh elements can be made, helping to lower the overall element count and produce a more structured mesh for the outer enclosure.
- We will mesh the two projections of the Ahmed body, which are located at the bottom of the surface, with finer mesh as these surfaces are comparatively smaller.
Outline > Mesh > right click & click 'Insert' > click 'Sizing' > select the two faces > put Element Size = 08 mm > Update the Mesh
- Now, we will add inflation layers at the boundary of the Ahmed body.
Outline > Mesh > right click & click 'Insert' > click 'Inflation' > Scoping method = Geometry Selection > select the geometry which included the inner enclosure and the Ahmed body surfaces > Boundary Scoping Method = Named Selections > select 'Car Wall' > Inflation Option = 'First Layer Thickness' > First Layer Height = 0.44 mm > Maximum Layers = 40 > Growth Rate = 1.3 > Update the Mesh
Here, the cell count is about 1.29 lacs. 


Similarly, we will change the element size at different regions of geometry two more individual times (for "Case 2" & "Case 3").
|
Case No. |
Base Sizing (mm) |
Body Sizing (mm) |
Face Sizing (mm) |
Cell Count |
|
1 |
100 |
50 |
08 |
1,28,753 |
|
2 |
100 |
30 |
06 |
3,23,132 |
|
3 |
100 |
25 |
5.5 |
4,72,868 |
The more the cell count, the more computation time is required.
PROCESSING / SOLVER -
Open the Ansys Workbench and click the 'Setup' file.
The blue rays in the model represent the inlet, while the red rays represent the outlet.

|
Fluent Setup |
||
|
Sr. No. |
Setup |
Command |
|
1. |
Solver Type |
Pressure based |
|
2. |
Solver Time |
Steady State |
|
3. |
Energy |
Off |
|
4. |
Turbulence Model |
K omega SST |
|
5. |
Material (Fluid) |
Air |
|
6. |
Inlet |
Velocity Inler (25 m/s) |
|
7. |
Outlet |
Pressure Outlet |
|
8. |
Car Wall |
Wall BC |
|
9. |
Side faces of the enclosure |
Symmetry BC |
|
10. |
Method |
Coupled |
Under the Domain toolbar, set -
Solver Type: Pressure-based
Solver Velocity-Formation: Absolute
Solver Time: Steady
Under the Physics toolbar, disable the energy equation as the temperature is not involved in this simulation study. In Viscous Model, select the 'k-omega' model and the 'SST k-omega' model. Click OK.
Keep the Materials and Cell Zone tools as they are.
Boundary Conditions -
For inlet:
Type = Velocity-inlet: Velocity Magnitude = 25 m/s
For Outlet:
Type = Pressure-outlet, Operating Conditions = 101325 Pa
Rest keep unchanged.
Now, we need to put the reference values so as to find out the results in post-processing.
Note - In order to solve problems involving aerodynamic concepts such as drag and lift, we must provide reference values in addition to other fluent settings.
Outline > Setup > Boundary Conditions > Reference Values > put Compute from = 'inlet' > Area = 0.065741 m2 > Length = 1.044 m
The value of the area, entered is the projected surface area, that is, the area of the car wall which is exposed to the inlet.
Outline > Results > Reports > Projected Areas > Surfaces = Car wall > Projection Direction = X
Thus, we got Area = 0.065741 m2
For Length = 1.044 m, we calculated it in SpaceClaim using the 'Measure' tool.
Under the Solutions Toolbar, click the 'Initialize' button choosing the 'Hybrid' method.
In this simulation, we are interested to find out drag and lift coefficients, therefore to calculate these values, we need to add them under 'Report Definition'.
Solution Toolbar > Reports > Definitions > New > Force Report > Drag
Under Drag Report Definition, put -
Name: drag
Report Output Type: Drag Coefficient
Zones: car_wall
Enable 'Print to Console' & click OK.
Similarly, for the lift coefficient report, the same procedure needs to be followed.
Now, we will run the simulation for 100 iterations. The solution is converged at the 69th iteration. 
We computed the drag and lift coefficients:
Drag Coefficient = 0.36302949
Lift Coefficient = 0.22525008
In post-processing, we will calculate all the results and draw out relevant inferences and conclusions.
POST-PROCESSING -
As we deleted the identical half of the entire geometry during the pre-processing, we need to create the half part here in post-processing so as to calculate the results.
Outline > User Locations and Plots > Default Transform > disable the 'Instancing Info From Domain' > enable 'Apply Reflection' > Method = XY Plane > put Z = '0 m' > click Apply
One may see the wake region formed over the body by coloring it with the 'Pressure' variable.
Outline > double click the 'Car_Wall' > Under 'Color' - Mode = Variable, Variable = Pressure > Apply 
Now, let's hide the car wall and create a plane (XY plane) to see flow separation more properly.
Location Tool > Plane > Geometry: Method = XY Plane, Z = -0.0001 m, Plane Type = Slice > Color: Mode = Variable, Variable = Velocity > Apply
Here, the wake region is formed due to flow separation resulting from the change in the flow direction at the different surfaces of the Ahmed body. 
Let's see the velocity vector on this newly created XY plane and color it with black color. 
Let's investigate the flow separation phenomenon -
We will create a few planes (YZ planes) at particular distances from the rear surface of the Ahmed body to investigate the nature of flow separation. 
It can be seen that, as we move away from the Ahmed body, the flow separation observed is negligible.
Now, we will plot velocity vectors on these YZ planes.


Again, observing the velocity vectors at the nearest and the farthest distance from the Ahmed body, it can be inferred that, flow separation keeps on decreasing as the flow moves away from the Ahmed body. 
Velocity magnitude is almost uniform at the farthest distance from the body.
Pressure & Velocity contour plots along the XY plane:

Note - Here, in post-processing, only basic data like pressure, and velocity is available under the 'Variable' section. However, if one needs to calculate parameters like surface transfer coefficient and wall shear stress, one needs to import it from the 'Setup File'.
Open the Setup File:
File > Export > Solution Data > File Type = CDAT for CFD-Post & Ensight > select required surfaces > select the data needed > click 'Write' 
Open the 'Results' File:
File > Load Results > select the saved file
Now, let's plot the 'Streamline' over the plane XY:
Change the color of Plane XY to black. Click the 'Streamline' tool, and enter the desired number of streamlines. 
Rotational flow (eddy flow) is observed clearly behind the Ahmed body due to flow separation.
For Animation:
Click 'Animation' tool > Type = Sweep Animation > select 'Streamline' > adjust the speed accordingly > click Play button
One can save this animation as well.
RESULTS -
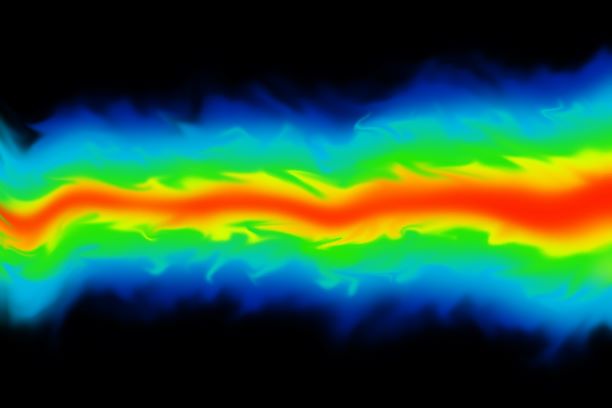
- Comparing Velocity & Pressure Contour Plots:
|
Case No. |
Velocity Contour Plot |
Pressure Contour Plot |
|
Case 1 |
|
|
|
Case 2 |
|
|
|
Case 3 |
|
|


The free stream velocity initially decreases to zero when the fluid collides with the body, and this point is referred to as the "Stagnation Point".
The fluid velocity close to the car wall is zero because of the no-slip condition. Due to flow separation, the end of the body experiences high recirculating fluid flow, and negative gauge pressure is also noted here.
- Drag Coefficient & Lift Coefficient Plots:
|
Case No. |
Drag Coefficient Plot |
Lift Coefficient Plot |
|
Case 1 |
|
|
|
Case 2 |
|
|
|
Case 3 |
|
|


As the geometry is simulated with a finer mesh, it is obvious that the drag coefficient is decreasing and the lift coefficient is increasing. There was no need to run a simulation for a more fine mesh because the estimated drag coefficient (0.33) was satisfied in the second scenario.
- Vector Plots (to identify Wake Region):
|
Case No. |
Velocity Vector Plot |
Pressure Vector Plot |
|
Case 1 |
|
|
|
Case 2 |
|
|
|
Case 3 |
|
|


Both velocity and pressure vector charts show recirculating fluid flow at the rear of the body. Comparing the third case to the first and second, less wake region is observed
- Flow Separation through vectors near Ahmed body:
|
Case No. |
Flow Separation near the Ahmed body |
|
Case 1 |
|
|
Case 2 |
|
|
Case 3 |
|


CONCLUSION -
|
Case |
Cell Count |
No. of Iterations |
Drag Coefficient value |
Lift Coefficient value |
|
1 |
1,28,753 |
69 |
0.363 |
0.225 |
|
2 |
3,23,132 |
71 |
0.323 |
0.261 |
|
3 |
4,72,868 |
66 |
0.304 |
0.262 |


In all three cases, it has been found that as the geometry's mesh is refined, the drag coefficient keeps falling and the lift coefficient keeps rising. Aerodynamically, any vehicle should have the lowest drag coefficient or drag force possible to maximize efficiency because, as we all know, doing so increases a vehicle's fuel economy. The results also suggest that the lift coefficient keeps rising as the geometry's mesh is refined.
There is a delay in the formation of the point of separation in the third case because the drag coefficient is relatively the lowest. As a result, it can be assumed that the wake region formed is the smallest.
REFERENCE - Fluid Mechanics - Fundamentals and Applications by Yunus A. Cengel & John M. Cimbala
Thus, simulations for external flow analysis over an Ahmed body were performed for three cases, and conclusions were drawn based on the results.
Leave a comment
Thanks for choosing to leave a comment. Please keep in mind that all the comments are moderated as per our comment policy, and your email will not be published for privacy reasons. Please leave a personal & meaningful conversation.
Other comments...
Be the first to add a comment
Read more Projects by Bhavesh Kumbhare (15)
Heat Transfer analysis using Battery Thermal Management System (BTMS) for Lithium ion battery module used in Electronic Vehicles using Ansys Fluent
Problem Statement AIM - A simulation for heat transfer analysis for the cylindrical Lithium ion battery, with heat generation boundary condition, is to be performed using Ansys Fluent. INTRODUCTION -Electric vehicles charge their batteries with electricity rather than using fossil fuels such as gasoline or diesel. Electric…

19 Jun 2023 11:58 AM IST
Week 9 - Parametric study on Gate valve.
AIM -A steady-state simulation for the parametric study of flow through a gate valve is to be performed in Ansys Fluent.INTRODUCTION & THEORY - Gate Valve -The most common type of valve in water supply systems is a gate valve. It is a linear-motion isolation valve with the ability to stop or allow flow. The closure…
23 Jan 2023 02:22 PM IST
Week 3 - External flow simulation over an Ahmed body.
AIM -A simulation for external flow analysis over an Ahmed body is to be carried out for the velocity of 25 m/sec with the default air properties in Ansys fluent. INTRODUCTION - It is asked to compute an external flow simulation over an Ahmed body using air, with a 25 m/sec velocity, as working fluid. The geometry…
10 Jan 2023 09:00 AM IST
Week 6 - CHT Analysis on a Graphics card
AIM - A steady-state simulation for Conjugate Heat Transfer (CHT) analysis of Graphics Card to be performed using Ansys Fluent. INTRODUCTION - Conjugate Heat Transfer (CHT) is the exchange of thermal energy at the interfaces of solid and fluid domains to transfer heat. That is, it includes both conduction and convection…
06 Jan 2023 08:22 AM IST
Related Courses


Skill-Lync offers industry relevant advanced engineering courses for engineering students by partnering with industry experts.


Our Company

4th Floor, BLOCK-B, Velachery - Tambaram Main Rd, Ram Nagar South, Madipakkam, Chennai, Tamil Nadu 600042.

Top Individual Courses
Top PG Programs
Skill-Lync Plus
Trending Blogs
© 2025 Skill-Lync Inc. All Rights Reserved.