


Courses by Software
Courses by Semester
Courses by Domain
Tool-focused Courses
Machine learning
POPULAR COURSES
Success Stories

Project 2
Objective: To route the Wiring harness on Given car body and Prepare flatten view drawing in CATIA V5 by applying all the packing rules add the protrction covering. Packaging rules and assumptions made in this project: Avoid harness routing and clipping in a blind zone. Avoid harness routing through the small structural…
D Vinay Kumar
updated on 14 Oct 2022


Objective: To route the Wiring harness on Given car body and Prepare flatten view drawing in CATIA V5 by applying all the packing rules add the protrction covering.
Packaging rules and assumptions made in this project:
- Avoid harness routing and clipping in a blind zone.
- Avoid harness routing through the small structural holes and openings to minimise the chaffing and handling of the wiring harness during installation.
- Provide additional slack to the harness according to the surrounding and harness bending requirements. And avoid excess slack to the harness.
- Provide sufficient clearance to the different surrounding parts.
- Avoid routing over the bolts, near to the bolted joints or screwed joints. Because it may damage the harness or may puncture the harness.
- Avoid routing near the sharp edges like thin sheet metal brackets, panel joints, etc.
- Provide at least 100mm clearance to the harness from the ABC pedals, clutch lever & cables, Engine timing belt or any other dynamic components.
- Enough clips and clamps should be provided to ensure the positive clearance with the surrounding and safety of the wiring harness.
- Ensure distance between two clamps on a straight branch should be maximum of 200mm.
- Clamping requirements should be decided based on the harness bending, surrounding and mounting arrangements.
- Provide positive clamping at the engine and chassis to avoid the harness damage when Engine rocks.
- Keep harness away from the transmission dynamic assemblies like drive shaft or propeller shaft.
- Provide the guiding channel if it is required.
- Use the rubber gromets which provide the proper sealing, and also protects the harness from the sharp edges and absorbs the vibrations.
- Wiring harness minimum branch length should be 50mm.
- Minimum distance between the clip and nearest branching point should be atleast 25mm.
- Minimum distance between two breakouts should be 50mm.
- Limit the number of branches coming out from the single branch to 4.
- Provide the bracket for the interconnection connector parking.
Steps followed for creating the wiring harness routing to the given Back door assembly:
Connector defination

to define the connector as electrical component we have to follow the following steps
1.Download the connector from the given link or from te.com website.

2.The connector is first opened in the part workbench and define bundle connection pint at the centre and connector connection point with axis system


3. Now we define the part as a connector in the electrical part workbench by given the number of terminals
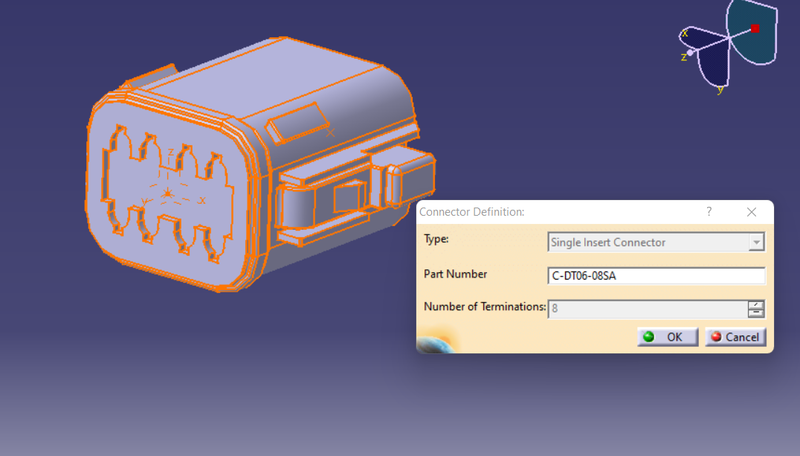
4. we have to define bundle connection point giving reperensation as the face and point as the bundle connection point and inital contact as the face of the bundle side

5. we have to define connector connecting point

By following these steps we define the given connector as electrical connector
by using store device we can save the connector in the catalogue

Support defination
Steps to define the component as electrial support
1. Open the component in the part design

2. Create entry point and exit point

3. create entry, exit and base planes
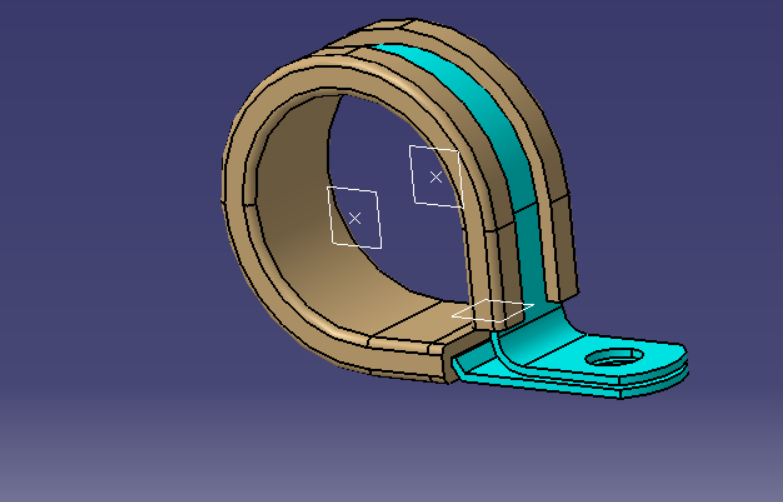
4. Open the electrical part workbench and define the support on both sides using entry plane and exit plane and base plane.

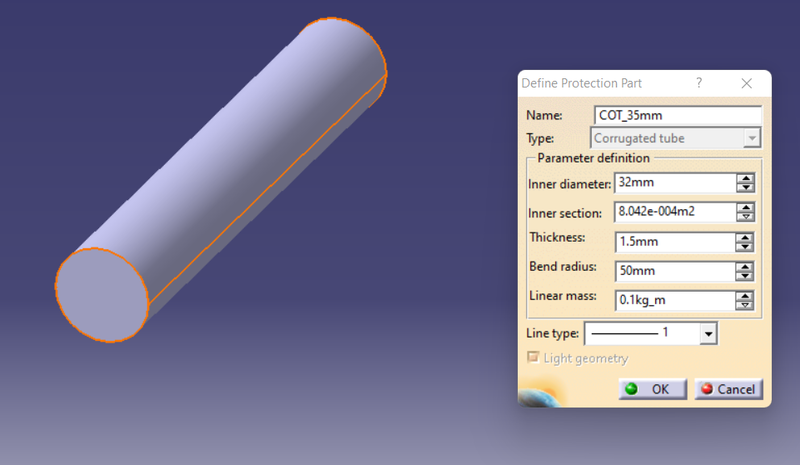
Defining protection covering
1.open the electrical part workbench and define protection part
enter the required dimensions

corrogated protection part is created
Create a catalog for corrogated tube and add a family of Slit cot and add the diffrent tubes in the catalog
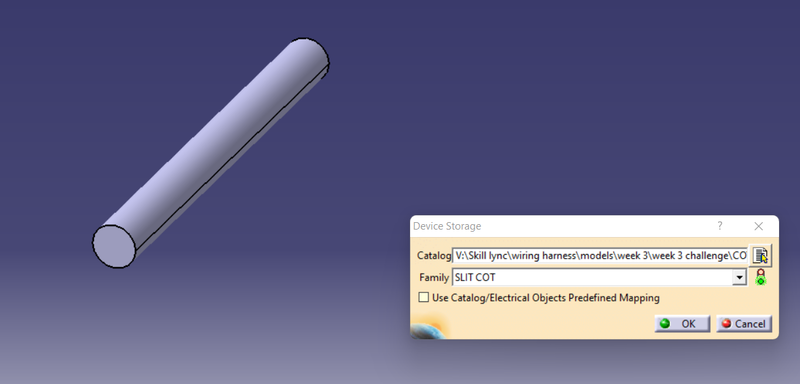
repeat the same for all the given tubes
Corrogated tube - 5mm


Corrogated tube - 10 mm

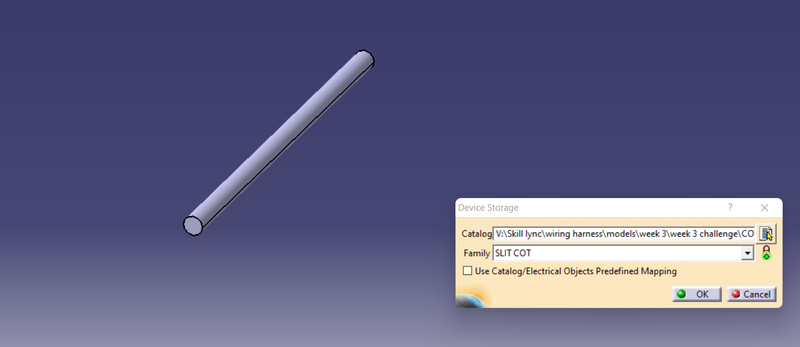
Corrogated tube - 15 mm


Corrogated tube- 35 mm

1 .Create a new product file and rename it as Back door assembly harness

2. Now copy and paste the back door assembly file to the context assembly.

3.Create a new product under context assembly and rename it as Assembly wiring harness
4. Import all the required connectors with electrical properties into the Geometrical bundle.

5. Place all the connectors in the specified locations of the engine using snap tools
6.After placing all the connectors, it is required to locate the interconnection connector.
7. Add p-clamps to the context assembly and not to the geometrical bundle assembly because they are fixed at the manufacturing line. If p-clamps are supplied with the wiring harness then it can be part of geometrical bundle assembly.

8. Now switch to Electrical harness assembly design.
9.Start the routing. Start from the interconnection connector.
10. Considering all the harness packaging rules, the harness for the engine is routed.
11.Add corrugated tubes for the bundles.

12. Check for bundle continuity. All the bundles are fully connected.

13.Create the electrical flattening of the geometrical bundle assembly.

14.Create the 2D drawing file with all the details.

Conclusion
Routed the wiring haress on given Back door and prepared Flatten view drawing by applying all packaging rules and protection covering as required
Leave a comment
Thanks for choosing to leave a comment. Please keep in mind that all the comments are moderated as per our comment policy, and your email will not be published for privacy reasons. Please leave a personal & meaningful conversation.
Other comments...
Be the first to add a comment
Read more Projects by D Vinay Kumar (28)
Project - Analysis of a practical automotive wiring circuit
1. Identify each of the major elements in the above automotive wiring diagram. The Major elements in the above wiring diagram ar Battery Generator Distributor Ammeter Fuse Ground/Earth Indicating Light/Beam light Starter Breaker Horn Light Switch/Selector Switch Junction Block Explain the Purpose and working of any…

12 Mar 2023 12:54 PM IST
Week 14 challenge
OBJECTIVE: The main objective of this project is to understand the fundamentals of GD&T and apply them to the design of a butterfly valve using Siemens NX. METHODOLOGY: For…
06 Nov 2022 08:06 AM IST
Project 2
Objective: To route the Wiring harness on Given car body and Prepare flatten view drawing in CATIA V5 by applying all the packing rules add the protrction covering. Packaging rules and assumptions made in this project: Avoid harness routing and clipping in a blind zone. Avoid harness routing through the small structural…
14 Oct 2022 04:13 PM IST
Project 1
Aim : TO route the wiring haress on given Engine and prepare Flatten view drawing by applying all packaging rules and protection covering as required Introduction: The automotive wiring harness consists of an electrical harness and the mechanical harness in the design. The current project is focused on the mechanical…
11 Oct 2022 04:27 PM IST
Related Courses


Skill-Lync offers industry relevant advanced engineering courses for engineering students by partnering with industry experts.


Our Company

4th Floor, BLOCK-B, Velachery - Tambaram Main Rd, Ram Nagar South, Madipakkam, Chennai, Tamil Nadu 600042.

Top Individual Courses
Top PG Programs
Skill-Lync Plus
Trending Blogs
© 2025 Skill-Lync Inc. All Rights Reserved.